Strict Standards: Only variables should be assigned by reference in /home/noahjames7/public_html/modules/mod_flexi_customcode/tmpl/default.php on line 24
Strict Standards: Non-static method modFlexiCustomCode::parsePHPviaFile() should not be called statically in /home/noahjames7/public_html/modules/mod_flexi_customcode/tmpl/default.php on line 54
Strict Standards: Only variables should be assigned by reference in /home/noahjames7/public_html/components/com_grid/GridBuilder.php on line 29
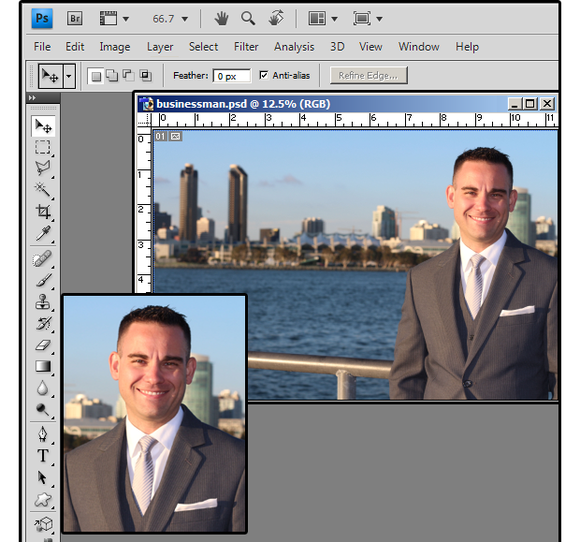
When your boss asked you to crop and size a photo of the new CFO like a “professional studio portrait” for corporate documents, you did it successfully. And here's your thanks: “Looks good, but now I want you to remove that busy background and replace it with something cleaner, like in photography studios.”
 JD Sartain
Original photo plus edited photo cropped and sized.
No problem. We’ll try some different canvas-style backgrounds, then let the boss choose. Remember, always work with the original 300 pixels per inch (ppi) image photo that you cropped last week, before it was sized and resampled. Open that file now.
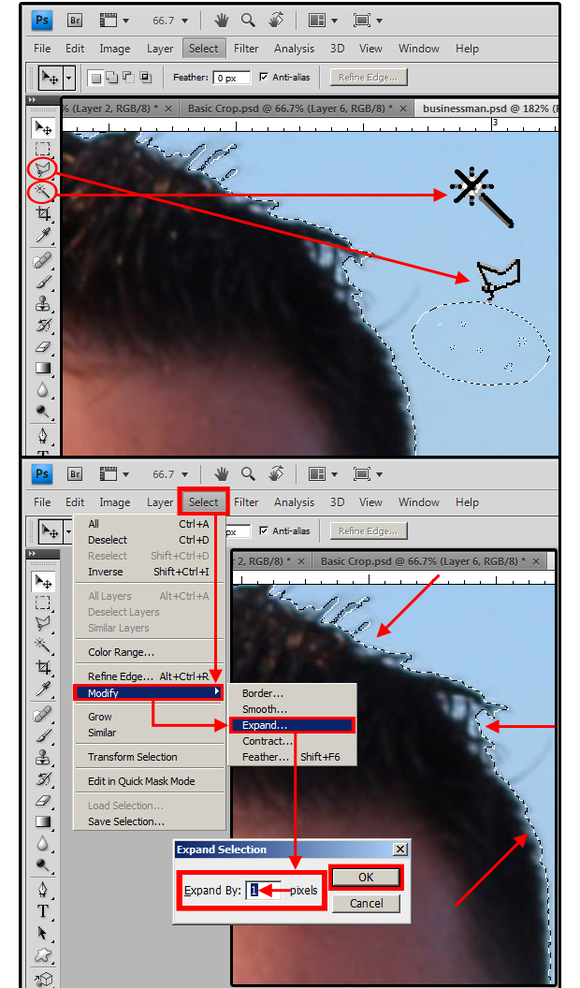
1. Use the Magic Wand tool and click the background area. Because there are multiple objects and colors in this background, one click won’t be enough. Hold down the Shift key to “extend” the selected area, and continue clicking the Magic Wand in different places until the entire background is selected. If the selected area creeps over onto your man’s suit, hair, or face, just click Undo, then use the Magic Wand in another area.
2. Once most of the background is selected, use the Polygonal Lasso to select the rest. Remember to press the Shift key to extend the selected area. The Polygonal Lasso is the easiest of the three Lasso tools. Just drag the cursor around an object, then click to stop, and drag again. This allows for very precise object selection.
3. Once the entire background is selected, Zoom in for a closer look. Notice that the selection is not quite aligned perfectly with the man’s hair, suit, face, and neck. To save time, let Photoshop do the rest. From the main menu, choose Select > Modify > Expand. In the Expand dialog box, enter the number 1 (to expand the selected area by one pixel), then click OK.
 JD Sartain
Select the background, then expand it.
Notice in the image below how the selected area expands to include a closer, more precise selection around the man.
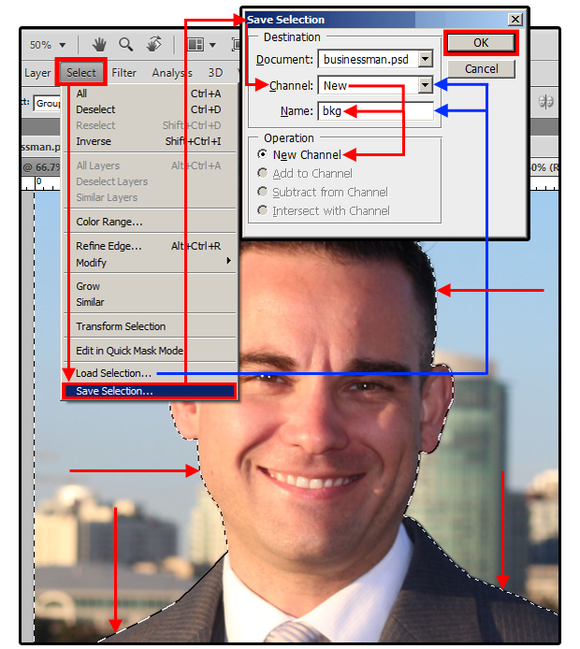
Before you do anything else, save this selection so you can use it later. From the main menu, choose Select > Save Selection. In the Save Selection dialog box, choose New for the Channel, then enter a descriptive name for this selected area (I use BKG for photo backgrounds). Ensure that the New Channel button is checked under Operation, then click OK.
Note: If this area is deselected for some reason, or you want to make changes to the background area later, you can choose Select > Load Selection, and click your saved area (BKG) from the Channel list. Photoshop reselects the exact area for you, so you can reuse it.
 JD Sartain
Save the selected background to use later.
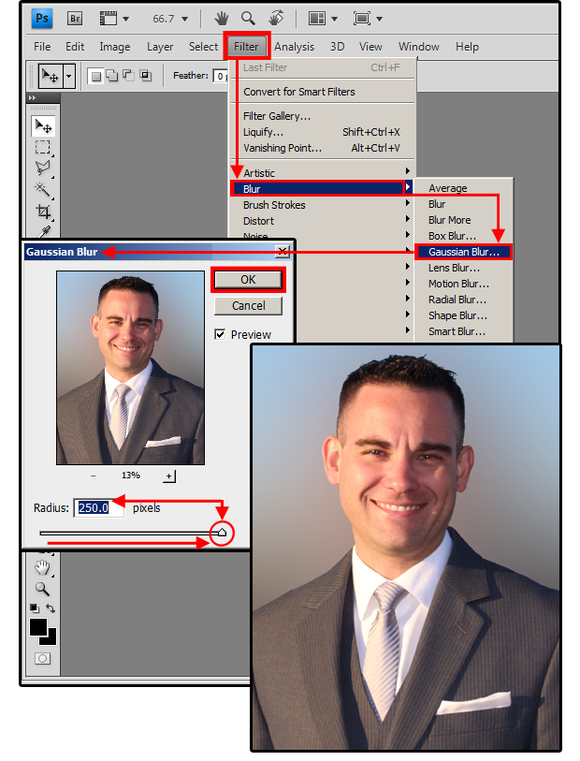
4. The first thing you must do is either cut out or blur out that busy, cityscape background. The easiest, quickest method, which also looks quite professional, is to blur it out using the Gaussian Blur effect. Ensure the background is selected (if not, choose Select > Load Selection) and click BKG (the name used for the background selection).
5. Next, select Filter > Blur > Gaussian Blur. In the Gaussian Blur dialog box, slide the Radius button all the way to the right or type 250.0 (pixels) in the Radius field box. Notice how the background blurs to a smooth, slightly gradient finish.
 JD Sartain
Use Gaussian Blur for a professional portrait-style background.
6. If the Gaussian background isn’t quite enough, try a canvas background next; however, do not undo the Gaussian Blur effect, or the previous, busy cityscape will show through the canvas texture.
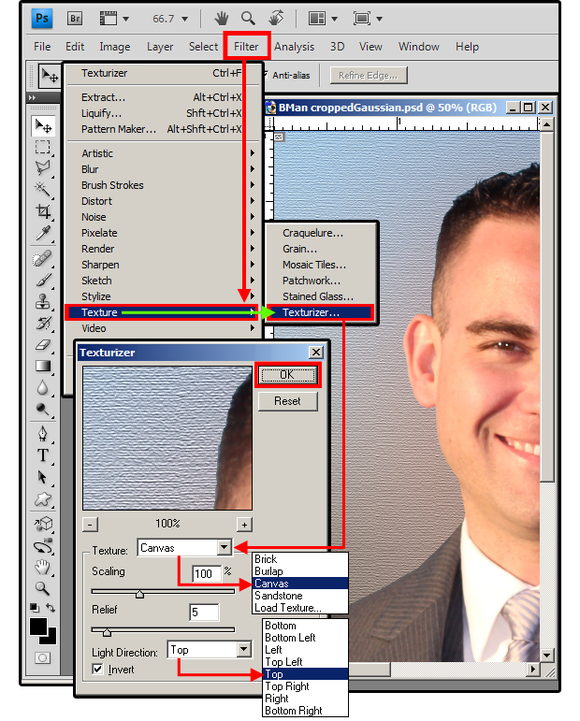
7. For canvas, select the background again, then choose Filter > Texture > Texturizer. In the Texturizer dialog box, select Canvas from the Texture field box, then move the slider until you get a nice effect. Notice the other texture options. Next, move the Relief slider to alter the depth of the canvas texture, then choose a Light Direction from the list. Because the Preview window shows every change you make, play around with the settings until you get the effect that works best. Click OK, and it’s finished.
 JD Sartain
Try a canvas-textured background.
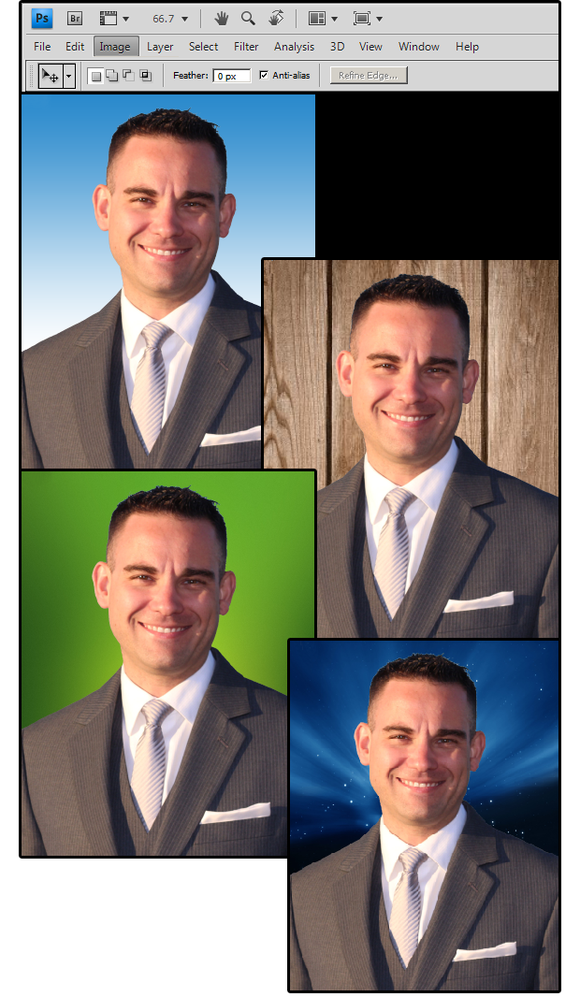
8. In Photoshop, the options for backgrounds are endless. You can create your own textures; or use gradients, styles, or even the backgrounds of other photos. The photo portraits in the following image have four different backgrounds. The first portrait uses a blue-and-white gradient background. The second portrait has a wood-textured background. The third portrait uses a Layer Style for that soft-green highlights background. The background of the fourth photo is another photograph of a midnight sky with stars and the bright glow of the moon.
 JD Sartain
Four different, custom backgrounds for your photo portraits.
Strict Standards: Only variables should be assigned by reference in /home/noahjames7/public_html/modules/mod_flexi_customcode/tmpl/default.php on line 24
Strict Standards: Non-static method modFlexiCustomCode::parsePHPviaFile() should not be called statically in /home/noahjames7/public_html/modules/mod_flexi_customcode/tmpl/default.php on line 54
Find out more by searching for it!
