Strict Standards: Only variables should be assigned by reference in /home/noahjames7/public_html/modules/mod_flexi_customcode/tmpl/default.php on line 24
Strict Standards: Non-static method modFlexiCustomCode::parsePHPviaFile() should not be called statically in /home/noahjames7/public_html/modules/mod_flexi_customcode/tmpl/default.php on line 54
Strict Standards: Only variables should be assigned by reference in /home/noahjames7/public_html/components/com_grid/GridBuilder.php on line 29
A fun effect referred to as the “twirl” has taken many Photoshop-based Facebook groups by storm. You can use it to quickly convert an ordinary image into a spectacular series of colorful swirls and twirls. While practical uses for this effect are admittedly slim—abstract art and funky backgrounds—it’s the perfect excuse to give yourself permission to play in Photoshop, which feeds your creative soul.
Happily, the technique works in nearly any version of Photoshop or Photoshop Elements. (While I was unable to confirm the original creator of this effect, Digital Darkroom Techniques and The Artist Makena have been credited by some.)
Prepare your image layers
The first step is to open an image in Photoshop or Photoshop Elements; if you’re in Elements, make sure you’re in Expert mode (it’s called Full Edit in older versions). In order to protect your original image, duplicate your image layer by pressing Command-J, which you can think of as jumping the active layer content onto another layer. If your image consists of multiple layers—say, an image layer plus a Levels adjustment layer or whatever—create a stamped copy by activating the topmost layer and pressing Shift-Option-Command-E. Next, double-click the duplicate (or stamped copy) layer’s name and enter Twirl 1.

Here’s what the Layers panel looks like in Photoshop (left) and Elements (right).
Now let’s run a few filters to prepare the image for twirling. With the duplicate or stamped copy layer active, choose Filter > Pixelate > Mezzotint in either program and, in the resulting dialog box, set the Type menu to Medium Lines and then press OK.
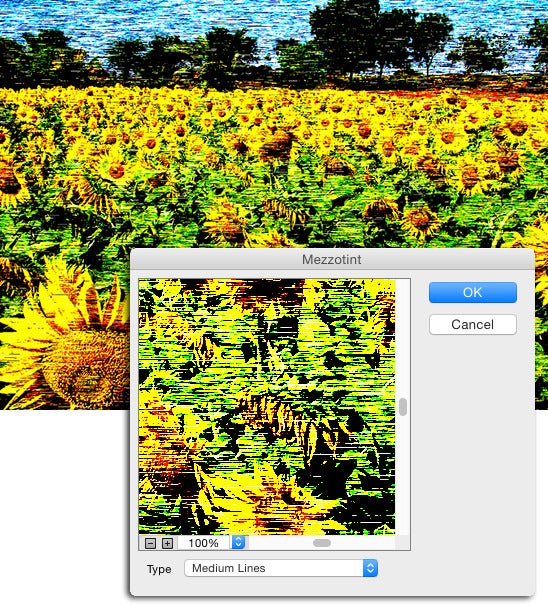
The Mezzotint filter tries to mimic a metal engraving process, which in Photoshop produces a random pattern of fully saturated colors.
Trot back up to the Filter menu and choose Blur > Radial Blur. Set the amount to 100, the blur method to Zoom and quality to Best. Rerun the blur filter a few more times by pressing Command-F.
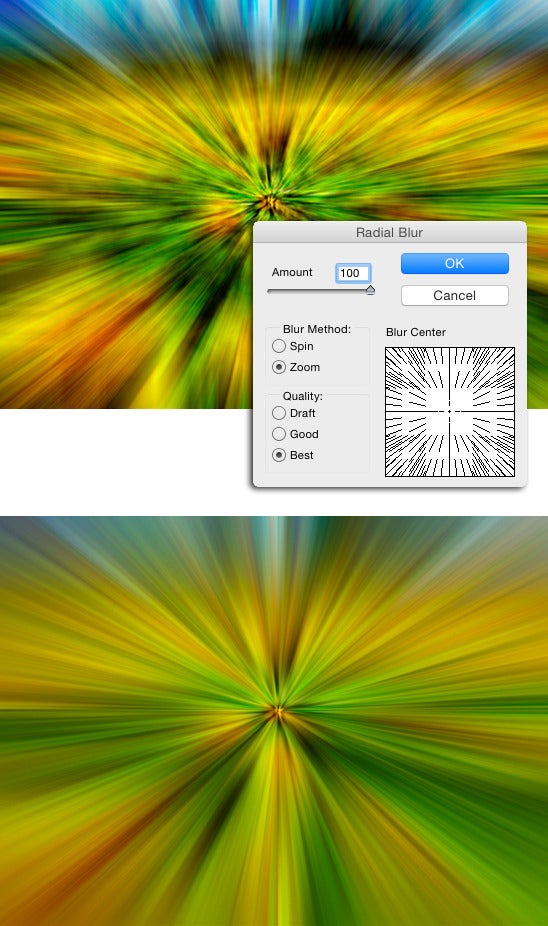
The more you run the Radial Blur filter, the smoother and more blended the tones become. Here’s the result of running the filter once (top) versus running it five times (bottom).
Tip: If you don’t see these filters in Photoshop CS6 or later (which has a truncated Filter menu), you can access them via the Filter Gallery instead. Otherwise, you can repopulate the Filter menu by choosing Photoshop > Preferences > Plug-Ins and turning on “Show all Filter Gallery groups and names.” Quit and restart the program for the change to take effect.
Create a twirl in opposite directions
Now you’re ready to twirl the image; however, in order to twirl it in two directions, you need to create another layer. Duplicate the Twirl 1 layer by pressing Command-J; double-click the new layer’s name and enter Twirl 2.
Now activate the Twirl 1 layer and choose Filter > Distort > Twirl. Enter an angle value of 80 or higher and then press OK (an angle of 120 was used here). Activate the Twirl 2 layer and choose Filter > Distort > Twirl. If you want a symmetrical twirl, enter the same value you used the first time but as a negative amount; for example, if you used an angle value of 125 the first time, enter -125 the second time. Otherwise, you can experiment with whatever angle value you want.
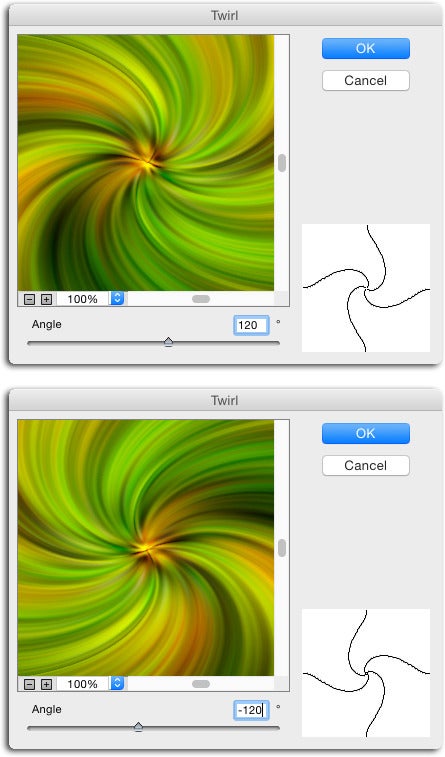
To create a symmetrical twirl in opposite directions, the first Twirl filter was applied to the Twirl 1 layer at an angle of 120 degrees (top) and the second Twirl filter was applied to the Twirl 2 layer at -120 degrees (bottom).
Blend the layers together
Nestled at the top of your Layers panel is a menu that controls how colors on different layers blend together (or cancel each other out). When you’re playing with blend modes, it’s helpful to think of the colors on your layers as being made of three parts: the base color, which is the color you start out with (the color on the Twirl 1 layer); the blend color, which is the color you’re adding to the base color (the color on the Twirl 2 layer); and the result, which is the color you get after mixing the base and blend colors using blend modes (the end result of this effect).
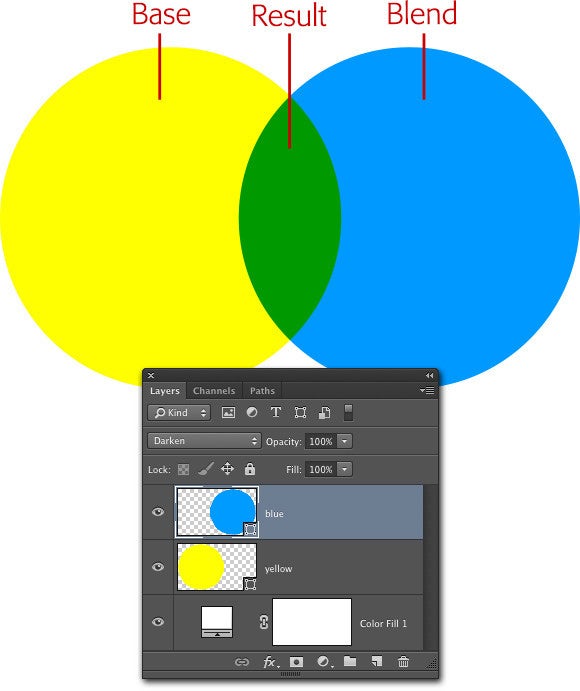
This infographic helps to explain how layer blend modes work.
With the Twirl 2 layer active, click the menu at the top of your Layers panel and choose Lighten, which causes the program to analyze each color channel and keep the lightest colors from the base and the blend colors. Pixels lighter than the blend color don’t change and pixels darker than the blend color are replaced with the result color. All other colors are nixed, including black. While Lighten mode works great for this effect, feel free to pour your favorite beverage and experiment with all the blend modes to see what kind of result you get.
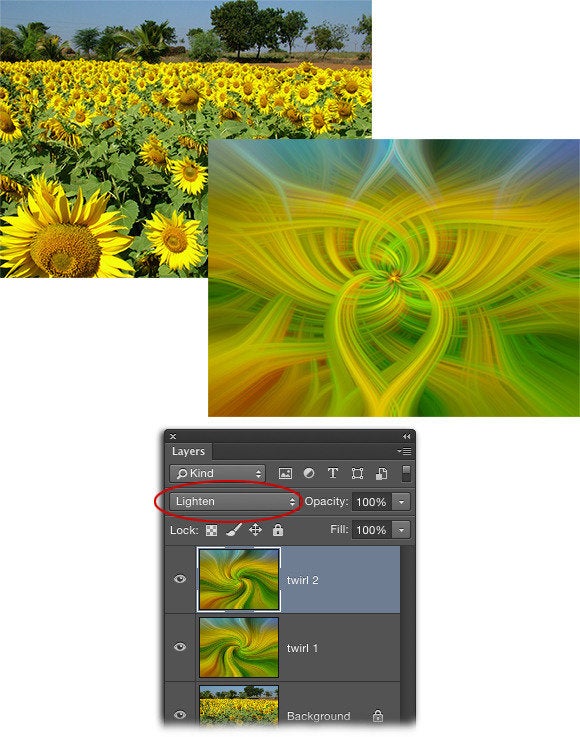
Here’s the before and after version, complete with Layers panel.
Last but not least, save a master file with your layers intact in case you want to continue editing the file later on. In either program, choose File > Save As and pick Photoshop from the format menu. To create a copy you can upload to the web, choose File > Save for Web and pick JPG or, if you’re uploading the file to Facebook, choose PNG (Facebook doesn’t tend to destroy PNGs as much as JPEGs).
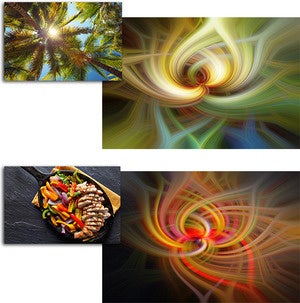
This effect works on any kind of photo, though if you want the twirl to be centered in the image, the image’s content also needs to be centered.
As you can see, playing in Photoshop (and Elements) is a worthwhile endeavor. Until next time, may the creative force be with you all!
Strict Standards: Only variables should be assigned by reference in /home/noahjames7/public_html/modules/mod_flexi_customcode/tmpl/default.php on line 24
Strict Standards: Non-static method modFlexiCustomCode::parsePHPviaFile() should not be called statically in /home/noahjames7/public_html/modules/mod_flexi_customcode/tmpl/default.php on line 54
Find out more by searching for it!

Custom Search