Strict Standards: Only variables should be assigned by reference in /home/noahjames7/public_html/modules/mod_flexi_customcode/tmpl/default.php on line 24
Strict Standards: Non-static method modFlexiCustomCode::parsePHPviaFile() should not be called statically in /home/noahjames7/public_html/modules/mod_flexi_customcode/tmpl/default.php on line 54
Strict Standards: Only variables should be assigned by reference in /home/noahjames7/public_html/components/com_grid/GridBuilder.php on line 29
Sitting quietly in the Tools panel of the popular image editors Adobe Photoshop, Photoshop Elements, and Pixelmator, is the Gradient tool, a wonderfully useful painting tool that lets you create a soft, gradual transition from one color to another (or several). But besides using the tool to add color to your designs, you can use it inside a layer mask (referred to as a gradient mask). By setting the two colors of the gradient to black and white—to conceal and reveal, respectively—the tool lets you fade layer content in interesting ways. In this column, you’ll discover six handy uses for this creative technique.
Fading images together

The gradient mask is circled here. A color tint was added to the top example to introduce color consistency between the two images.
A gradient mask lets you quickly fade images together into a collage. With at least two images on separate layers within the same document, position the image you want on the top of your collage at the top of the layer stack. Add a layer mask to it by clicking the circle-within-a-square icon at the bottom of your Layers panel in Photoshop; it’s at the top of the Layers panel in Photoshop Elements’ Expert Mode (in Pixelmator, choose Layer > Add Layer Mask).
Next, press G to grab the Gradient tool—this keyboard shortcut works in all three apps—and then choose a black-to-white, linear gradient. To do this in Photoshop, trot up to the Options bar and click the down-pointing triangle next to the gradient preview. From the resulting menu, click the black-to-white gradient (third from left in the top row), and then click the linear gradient button to the menu’s right. In Elements’ Tool Options panel, you’ll find similar controls. In Pixelmator, once you activate the Gradient tool, click the gradient preview at upper left of your document and in the resulting menu, click the black to white linear gradient icon.
With the layer mask active (you’ll see a colored border around it), click and hold your mouse button down where you want the fade to begin, drag in any direction and then let go of your mouse. As you drag, a line represents the width of the fade: The shorter the line (the less distance you drag), the narrower the fade and the harsher the transition; the longer the line, the wider the gradient and the softer the fade. When you release your mouse button, the app plops the gradient into the layer mask (circled below), which fades the images together. All three apps automatically update the mask as you drag with the Gradient tool, so keep clicking and dragging until you’re satisfied.
Fading color to black and white

Try dragging from corner to corner or top to bottom and see what you get—depending on your image, one gradient angle may look better than another.
Softly fading a color image to black and white is another creative and impactful effect. To start, add a black and white effect to your image. In Photoshop, click the half-black/half-white circle at the bottom of the Layers panel and choose Black & White. In Elements’ Expert mode, press D to set the color chips at the bottom of the Tools panel to black and white, and then press X until black hops on top.
Next, click the half-black/half-white circle at the top of the Layers panel and choose Gradient Map. In Pixelmator, duplicate your image layer and then in the Color Adjustments category of the Effects panel, double-click the Black & White icon. In the resulting Black & White palette, adjust the contrast to your liking and click OK. With the duplicate layer active, choose Layer> Add Layer Mask and then set the Gradient tool to a black-and-white, linear gradient as described earlier. Click and hold atop your image where you want the color to start fading out, and then drag in any direction for a screen inch or two.
Fading solid color into a photo

Notice how the faded color in these examples creates a safe spot for text.
By fading a solid color onto one side of a photo, you create a safe spot for text, which is handy for photographic announcements (invitations, announcements, etc). It’s easily done by adding a solid color fill layer at the top of your layer stack and then using the Gradient tool in the mask that comes with the layer. To do it in Photoshop and Elements, choose Layer > New Fill Layer > Solid Color and choose whatever color you want in the resulting Color Picker. In Pixelmator, add a new layer at the top of your layer stack, fill it with color, then add a layer mask. Configure the Gradient tool as described earlier and, with the layer mask active, click and drag within your document where you want the color to begin.
Creating a photo reflection

A layer filled with black was also added to the bottom of this piece.
Reflections are great for adding depth or making an object look like it was photographed on another surface (say, a reflective table). The basic gist of this technique is to duplicate an image layer and flip it vertically. In Photoshop, you can do this in one fell swoop by pressing Option while choosing Edit > Free Transform> Flip Vertically. In Elements, duplicate the layer and choose Image > Flip Layer Vertical. In Pixelmator, duplicate the image layer and choose Edit > Flip Vertical. Use the Crop tool in those apps to add about two screen inches of extra canvas space at the bottom of your document, and then with the Move tool active, Shift-drag the duplicate layer beneath the original image (they should almost touch).
Add a layer mask to the duplicate layer, grab the Gradient tool, and Shift-drag from the bottom of the image upward to roughly the height you’d like the reflection to be. Soften the reflection by lowering its layer opacity to about 50–75 percent.
Faded text
You can use a gradient mask to fade text into a photo, which makes the text feel like it’s part of the scene. Once you add some text to your document, add a layer mask to the text layer and then configure the Gradient tool as described above. With the mask active, mouse over to your document and Shift-drag upward from near the bottom of the letters.
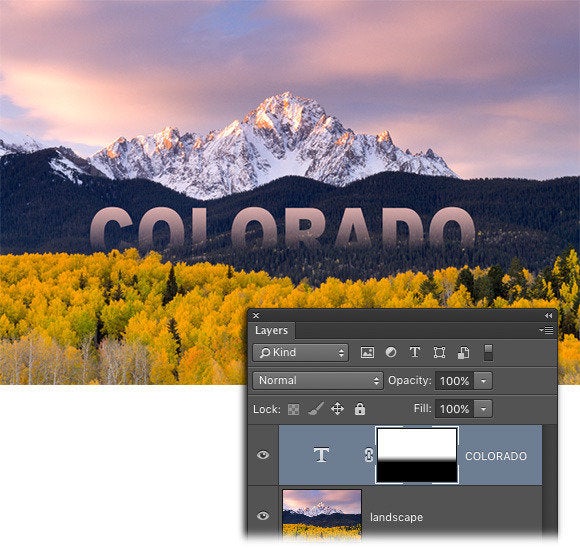
Be sure to use a big, thick font—say, Arial Black—so you can see the effect (thin characters won’t work).
As you can see, gradient masks are extremely useful though this list barely scratches the surface of what’s possible. The more you use them, the more uses you’ll discover. Until next time, may the creative force be with you all!
Strict Standards: Only variables should be assigned by reference in /home/noahjames7/public_html/modules/mod_flexi_customcode/tmpl/default.php on line 24
Strict Standards: Non-static method modFlexiCustomCode::parsePHPviaFile() should not be called statically in /home/noahjames7/public_html/modules/mod_flexi_customcode/tmpl/default.php on line 54
Find out more by searching for it!

Custom Search